Wednesday, 23 December 2015

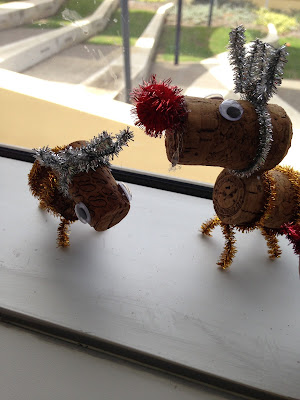
Cork Reindeer Decorations

there's hot glue on a reindeer whoops
Hey guys! The holidays have started and we're ready for Christmas. So since it's literally right around the corner, we thought we would share a quick, easy diy. This is a simple reindeer decoration that can make your house feel more festive.

What you need:

  • Pipe cleaners (we cut them in half)
  • Pom-poms 
  • A few old corks; two for each reindeer
  • Googly eyes
  • A hot glue gun/PVA glue

    Instructions:

    1. Pick two corks that complement each other and look like a head and body.
    2. Position a pipe cleaner around the "head" of the reindeer, towards the back to create antlers.


    3. Twist the pipe cleaner to secure this.
    4. You might want to bend/adjust the antlers so they look more realistic.
     
    5. If you are making a bigger reindeer, wrap another pipe cleaner around the existing antlers to create another set.
    6. Heat up the glue gun-just a reminder, hot glue guns are pretty hot, so be careful.
    7. Use the glue gun to stick the googly eyes onto the head.
  

  • 8. Set that aside, and start positioning pipe cleaners onto the body.
    9. Wrap the pipe cleaner like you did with the head, repeating to make two sets of legs.
  • 10. Once you are satisfied with the pipe cleaners, hot glue the head onto the body.
     

    11. We decided to trim the legs slightly to make it look better.


    12. At this point, you can choose to add a pom-pom for a nose.  
    13. Adjust the legs so your reindeer can stand up, and you're done!


xx, Thea and Yi Xin

Tuesday, 15 December 2015

DIY Pin-Up Board

Pin up boards are reeeeeally common and really pretty (not to mention useful). But there is always something wrong with the one I buy, whether it's the thickness or the frame. So I decided to come up with a plan to make one myself. (I haven't actually made this yet but it should work).

What to buy:

-A piece of soft wood (the size of this determines the size of the whole board)
- Scraps of wood to frame 
- A piece of cork the size of the soft wood OR A thick fabric (choose a nicely patterned one!)
- Ribbons
- Hot glue gun and glue sticks / Superglue
- Hooks (the ones for picture frames)

How to make it:

1. Gather all your materials and plug in your hot glue gun (if you choose to use hot glue).

2. Cut and size the cork, soft wood and/or the fabric if it is not the same size as each other. Remember to cut the wood for the frame the same sizes as the one parallel to it.

3. Glue them all into place. (the frame on the cork or fabric on the cork).

4. Wait for it to dry and add any decorations if you want to.

5. Using a drill or screws, put the hooks behind the pin-up board.

6. Hang it up with some ribbon and you're done!

XX, Jas

Friday, 11 December 2015

DIY Percy Jackson Blue Pancakes

When I was younger, I used to read the Percy Jackson series. One thing that I remember clearly were the blue foods that Percy's mum used to make. 

So here is my own version of her pancakes.

**this recipe make 

Ingredients:

-Self Raising Flour
Milk 
-Blue Food Colouring (you can use as much as you want, but the more you use the bluer it    will be)
-Belgian dark chocolate buttons (any chocolate chip/button will do, and use as much as you  want)
-1 tsp vanilla essence  
-Cooking oil (any type will do, I used Rice Bran Oil with the spray can)

How to prepare:

1. Sieve your flour into a large bowl. 

2. Add the milk and vanilla into the bowl. whisk until it becomes a creamy colour. 

3. Mix in your food colouring ( the shade you end up with will look close to a Tiffany or Baby     Blue)

5. Add in your chocolate buttons (If they are slightly larger, cut into quarters).

How to cook:

1. Spray/ Add a little bit of oil to your pan.

2. Pour a reasonably sized amount to your pan.

3. Cook until you can see the sides of the pancake change to a darker shade and 'bubbles' appear in the pancake.

4. Get your spatula under the pancake and flip carefully (if you are a bit afraid of this step, get an adult to do it).

5. Stack them up and repeat.

6. Serve and enjoy!


Serving tips
- Chop up some bananas, strawberries, blueberries or any other type of fruit.
- Melt up some more of the chocolate you are using to drizzle over the pancakes.
- Enjoy whilst hot! (The chocolate will be all gooey and delicious).


xx, Jas

Monday, 7 December 2015

DIY Nachos + Salsa

Hi there and welcome to Ukiyos latest blog post! Today I will be showing you guys a quick recipe/ tutorial for how to make Nachos with Salsa. Nachos are one of my favourite foods, so I hope that you enjoy these nachos as much as I do! Enjoy:)

Ingredients (To make about 3- 4 servings)
- About 250g of Corn Chips (It doesn't matter what brand or flavour you use, but for this recipe I will be using Mission brand Extreme Cheese)
- Grated Cheese (Again, it doesn't matter what type of cheese you use)

For the Salsa you will need:
-250 g tomatoes, diced; you can always use more of you feel this isn't enough
- 1/2- 1 tablespoon tomato sauce
- 1/2- 1 tablespoon olive oil
- 1/2 chilli, finely diced
-1/2 Small green capsicum, finely diced

Recipe:
1. Take a handful of corn chips from the packet and place on a plate
2. Then take a handful of grated cheese and place on top of the corn chips.


3. Microwave for 20 to 30 seconds.
4. Put the nachos aside for now, and get the salsa ingredients ready.
5. Add the oil to a sauce pan and then the capsicum.Stir for about 2 minutes, then stir in the tomato and tomato sauce, and then bring the mixture to boil.
6. Reduce the heat to medium- low. Simmer, uncovered, for about 15 minutes and then wait for the salsa to cool completely. 

Put the salsa onto the nachos, and enjoy ðŸ˜ŠðŸ˜‹
- Elise💕

Wednesday, 2 December 2015

christmas shuffle mix

ITS DECEMBER.
Which means school ending, summer holidays starting, and most importantly, it's christmas season. I really enjoy this time of the year. I don't know why, but christmas makes me feel all warm and fuzzy inside. All the tests in school being over adds to the holiday spirit; being able to do absolutely nothing but listen to christmas music. So here is my playlist to get all the december vibes going. Follow us on spotify here


p.s. pick a song to start off the playlist, then make sure you click shuffle, because it's one of those playlists ;)

xx, thea

Sunday, 29 November 2015

Nutella Mug Cake

Ok, so i'm pretty sure that everyone loves nutella. Nutella goes with anything, or just by itself. But sometimes it's good to experiment and change it up a little. This mug cake is simple and easy and it doesn't require many ingredients. It's also big enough for two - depending on how much you love cake. 

Ingredients 
- 4 tbsp Self Raising Flour
- 3 tbsp White Sugar
- 1 Egg, Beaten until fluffy
- 2 or 3 tbsp Nutella (depends on your preferences) 
- 3 tbsp Milk
- 2 tbsp Cocoa Powder (optional)

Equipment
- (large) Mug
- fork/whisk/whatever you use to whisk stuff
- measuring cups

Method
1. Mix all the dry ingredients together in a mug. in a separate bowl, mix all the wet ingredients. Do not add in the Nutella yet.

2. Add the wet mixture to the dry mix in the mug. make sure that everything is blended properly and that there are no lumps of flour.

3. Add the nutella. This might take a while as the nutella will stick everywhere.

4. Microwave for 1.50 - 3 minutes. the time of microwaving may vary from different microwaves. I recommend that you start with 1 min 20 sec and if it is not done then microwave for another 15 seconds. Keep repeating this process till done.

You can eat the cake plain or add whipped cream or ice cream if you want. Enjoy!

xx, Yi Xin


Follow us on Spotify

Follow us on Spotify to listen all our playlists :)
https://open.spotify.com/user/uukiyo

Follow us on Bloglovin

Follow us on Bloglovin to get notified when we post ;)
<a href="http://www.bloglovin.com/blog/14570289/?claim=xgg7dgpbe2t">Follow my blog with Bloglovin</a>

Friday, 27 November 2015

how to get the best out of an iphone camera

the light changes a lot but whatever ^^
Now this might seem really stupid, like I'm trying to teach people how to walk or something, but there are some tips I've picked up from my traveling. I've only ever taken photos with my iPhone 5c, which has an 8 megapixel camera. It's definitely not on the same wavelength as professional Canon or Nikon cameras, but it does the job. Anyways, if you're not looking to blow it up to a huge wall-sized poster, it doesn't really matter*. This is quite a long blog post, sorry about that ;)
*side note, you can print these pictures out in approximately an A4 size before it starts to blur

1. Backup
I always backup my pictures once my storage starts to fill up. Working on a phone with a 16gb capacity, you don't really have that much space, especially if you have a lot of apps installed. Bring a laptop to backup, or for Android phones, an extra memory card/phone compatible USB. If you don't feel the need to bring around your own laptop, you can always just bring a USB and borrow the hotel's computer. 
an example of focus

2. Focus
Playing with the focus of your camera can easily bring depth to your pictures. With the 5c camera, you need to get pretty close, so using focus works better with something that doesn't have to be fully captured. Simply tap on the object you want to focus on, and when the background is out of focus you know you're close enough.

another example of using focus
3. Angles
A simple change of angle can completely alter your photo. When taking them, try a couple of different angles to have a varied selection. Try a low angle, which is effective with tall buildings, or a bird's eye view for pretty foodie shots.

not really that extreme of an angle, but you get the idea

4. Zoom
Stay away from the zoom feature as much as you can. I personally think it's aesthetic suicide for your travel pictures. It's best to get as close as you can rather than using the iPhone zoom. Also, after taking the shot you can crop and adjust the perspectives. It makes a better picture since the zoom produces a grainy, blurred shot. To do this, I have a really nice editing app.

edited with vsco cam
5. VSCO Cam
You've probably used this app before, but if you haven't, it's genuinely amazing. It's free on both the Apple and Google Play store, with in-app purchases for extra filters. To be honest, it's basically a filter app, but there are a lot of hidden features. Small icons represent the adjustment options, which include perspective adjuster, basic fixes like exposure, and things like shadow tints.  Also, I NEED TO STRESS HOW GOOD THEIR FILTERS ARE. These are little saviours for your pictures and can make a horrible photo look great. But on that note, be careful not to over edit.


for some reason, this b&w filter works really well with this photo
I honestly think no-one read this whole post, but if you did thank you vv much. I hope you got something out of this and didn't get the impression that I think I'm better than anyone at taking pictures. There's a lot more things you can do, but if I wrote them all down this post would be super long.
 xx, thea

DIY Hair Bows

Sometimes you want to find the perfect accessory, maybe something to go with your outfit or something to compliment your nails or whatever. But finding that something can be a little frustrating. I find it easier to just DIY.

Materials
 - whatever fabric you like (I find it easier to use cotton based fabric) 
- some sewing thread  
- a small needle

Instructions
1. Cut a piece of your fabric twice the width of your bow. What that means is that if I wanted a bow approximately 8 cm x 4 cm, I would cut a rectangle of 8 cm x 8 cm2. Fold your fabric in half width wise and stitch along the edge of the fabric. Make sure that you at least have a seam of 1 cm. Also be sure that you sew the seam on the opposite side of the fabric that you want to use.


The fabric doesn't have to be perfectly aligned, as it should be stitched together in a straight line


3.  Now turn the fabric inside out so that the stitches are hidden. Flatten the fabric so that the seam is in the middle. 


4. Turn in the raw edges so that it looks clean. Stitch close to the edge, preferably using a complimentary thread. do this to both sides


This is what the 'bow' should look like after the edges has been turned in


5. Fold the bow accordion style to create the bow tie folded effect.


6. (This is where a sewing machine would come in handy). Sew all the folds together from top to bottom. if you have a sewing machine, just place the bow under the foot and you can stitch it like so.


7. Cut a small strip of either the same fabric or a contrasting one, and wrap it around the center of the bow. It's a lot easier to just use super glue or something similar to hold it together. If you do this, it just makes it easier to attach a bobby pin or hair clip. 


And there you have it! This design is totally flexible so you can make many alterations if you need to. 


xx, yi xin

Wednesday, 25 November 2015

Jas Recommends...

Peanut Butter+Nutella Sandwiches and The Pitbull's Blog

BELIEVE ME, YOU WILL REGRET THEM NOT.

And I have a side blog which I have just started since I am passionate about dogs, pets and animals who need help- human help. If that's just like you, please check it out!

thepitbullsblog.weebly.com

XX, Jas

Genting and Cameron Highlands, Malaysia's Unknown Beauties


The first time I went to Genting was when I was so small I couldn't even remember.

But the fun you'll have there, is something you won't forget.

If you like cozy, family places where you can just chill, then Genting and Cameron are the places to go.

Cameron Highland is a humid, slightly chilly place up high in the mountains. They are best known for their strawberries. If you visit, you'll get back home and realise how bad the ones we eat taste. There's definitely something in the air. No one leaves without buying something with a strawberry on it. Even if it is a pillow or a glass keychain with strawberries laser-ed into the middle which you lose because you took it to school to show your friends and still cry about it to this day.

Genting is the opposite of that. Its so cold that sometimes you need a winter coat. IN MALAYSIA. It's nearly always foggy and it's what makes the place. They had an awesome theme park (outdoor and indoor) and a gaming park too. They got rid of the theme parks... and built some NEW ones! I'm pretty sure they might open in time for Christmas this year! Another fact is, one man painstakingly built the 3 km road up the mountain for his family, so ask about the history from some staff there, it's pretty cool.

Every time I go, I always stay at Resorts World, in the Maxim tower, but it's hard to get in unless you book, so any one is good (but there are some with ghost stories so check out Genting stories before you book). 

There is a casino for adults in Genting and is SO exclusive, kids can't even go to that level! And downstairs, it gets really chilly, so all you need to do is pop into the Starbucks and buy a 15RM Venti Hot Choc! Then, when you're all warmed up, head to the Baskin Robbins there. In the morning, I always opt for the buffet- their soups are the BEST and if breakky isn't your thing, head over to the corner cafe for their carrot cake and mushroom soup. You won't regret a thing.


So do yourselves a favour, and next time you jump on a super cheap flight to Asia, take a chance with Malaysia- you'll find your second home there.

XX, Jas


DIY Clay Pendants

So, one day, I was messing around with clay and made a little heart.

 I wanted to make this moment a memory so I baked it when I went home. 

These are the instructions on how to do it, if you've never done it before.


  1. Mold your clay: you can buy these fancy clay shapers but my own personal pref,  is hand-shaped things because it gives it a more authentic feel.
  2. Poke a hole: you can put it in the top, side, middle- wherever you want, but keep in mind it has to work as a pendant on a necklace.
  3. Bake it: you can pop it in the oven with your food if you are sure there aren't any toxic fumes but I like to be safe and bake them by themselves. Use under 130 degrees Celsius and it will bake pretty well. (if you check that you were actually using clay and not plasticine. Been there, done that.)
  4. Glaze it: You can buy expensive glaze if you want it to look REALLY pro, but clear nail varnish worked for me too. Some top coats can go dull after a while so I just top them up with an extra layer.

Last but not least, can I just PLEASE stress AGAIN, how important it is to check that your clay is oven-safe and isn't air-dry. (Again, trial and error, guys)


summer mix

So in Australia, we are officially at the hottest point of summer right now. And it's going to get to the 40's pretty soon. To make the most of the weather, going to the beach or having a picnic is a great idea. But the cherry on top is some really good music to listen to. Whether you blast it out of speakers or listen to it with earphones while you're trying to do work in class, this playlist is a mix of some quality music including songs by lesser-known artists.
  1.  Drops - FKJ ft. Tom Bailey
  2.  Sorry - Justin Bieber
  3.  We Don't Believe What's On Tv - twenty one pilots
  4.  Jupiter Grayscale - Gallant
  5.  Can't Sleep Love - Pentatonix
  6.  TRNDSTTR (Lucian remix) - Black Coast ft. M. Maggie
  7.  Gold - Dream Koala 
  8.  End of the Day - One Direction 
  9.  Paradise Awaits (FKJ remix) - ZHU
  10.  Unstoppable - Lianne La Havas*
  11.  Box Around the Sun - Misterwives
  12.  Tear in My Heart - twenty one pilots
  13.  Groove - Jack and Jack
*try the FKJ remix when you're feeling extra happy

xx, ukiyo

Listen to the playlist here*
Make sure to follow us on Spotify: uukiyo
*Unfortunately, tracks 1 & 9 aren't available on Spotify but we'll add more songs and playlists when the time comes. Track 1 is available for free download at FKJ's Soundcloud here.

Tuesday, 24 November 2015

Brunching: Typika Coffee Roasters

Brunch is probably my favourite meal of the day. If it counts as a meal. Why do I like it so much?
  1. You get to sleep in but not be a total slob because of the 11am time
  2. Since it's two meals put together, you're allowed to eat twice as much :)
  3. It's a perfect time to catch up with friends, or enjoy some time with family
It's quite easy to find brunch places around you, but they're not always good. Most of them are located in the trendier areas of the city, or urban areas with lots of cafes. In Perth, a place I really like is Typika Coffee Roasters. After my first impromptu trip, which happened due to a quick Urbanspoon search, I fell in love. The atmosphere of the place is great, the staff are helpful and friendly and most importantly the food is amazing. I've eaten there a lot of times since then, and each time the standard stays high. It's nice how they have a regularly updated "specials" menu where certain dishes are spotlighted for a period of time. I suggest trying any variation of their eggs benedict, their pulled pork quesadillas, and their deconstructed hot chocolate is interesting. They also have a small cafe where you can pick up something on the go with a cup of coffee, made from their in-house coffee roaster. However, I have yet to try all the menu items so feel free to pick something else ;)
Typika's Deconstructed Hot Chocolate


Eggs Benedict (GF option)

You can find Typika Coffee Roasters in the heart of Claremont at 331 Stirling Highway
xx, thea

Welcome to Ukiyo


Welcome to Ukiyo! We are a blog set up by 6 friends from high school. 
'UKIYO' is a Japanese word meaning the floating world; living in the moment and being detached from the bothers of life. On this blog, we plan to post about fashion, travelling, d.i.y.'s, art and food. 

We hope you find it useful. Make sure to comment and leave suggestions for anything you would like us to write about.
Until then...happy floating ;)
- Thea, Jas, Mirielle, Yi Xin, Tanisha & Elise

P.S All photos used on this blog are ours unless stated:) Please give us credit if you are going to use them😄