Wednesday, 13 January 2016

DIY Gummy Bear Popsicles


It's Summertime here in Australia and the weather is scorching hot, so I think these Popsicles are the perfect refreshment. They are extremely easy to make and are my favourite treat by far. 


You will need:
- Drink(s) of your choice ( I'm using Sprite and Fanta)
- Popsicle moulds 
- Gummy bears


1. Half-fill each of the Popsicle moulds with your choice of drink.


2. Add a couple of gummy bears and then keep in the freezer to set.


3. After about 1 hour, take the Popsicle moulds out of the freezer. Then fill the remainder of each mould with the drink(s) and add more gummy bears.


4. Leave in the freezer to set.


You now have your very own gummy bear popsicles, sure to be a crowd pleaser!
xx, Tanisha


Wednesday, 23 December 2015

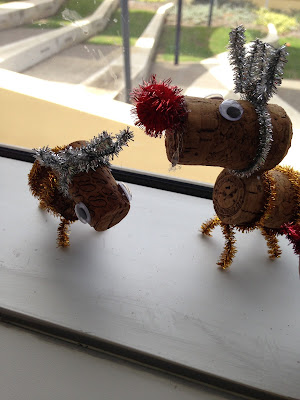
Cork Reindeer Decorations

there's hot glue on a reindeer whoops
Hey guys! The holidays have started and we're ready for Christmas. So since it's literally right around the corner, we thought we would share a quick, easy diy. This is a simple reindeer decoration that can make your house feel more festive.

What you need:

  • Pipe cleaners (we cut them in half)
  • Pom-poms 
  • A few old corks; two for each reindeer
  • Googly eyes
  • A hot glue gun/PVA glue

    Instructions:

    1. Pick two corks that complement each other and look like a head and body.
    2. Position a pipe cleaner around the "head" of the reindeer, towards the back to create antlers.


    3. Twist the pipe cleaner to secure this.
    4. You might want to bend/adjust the antlers so they look more realistic.
     
    5. If you are making a bigger reindeer, wrap another pipe cleaner around the existing antlers to create another set.
    6. Heat up the glue gun-just a reminder, hot glue guns are pretty hot, so be careful.
    7. Use the glue gun to stick the googly eyes onto the head.
  

  • 8. Set that aside, and start positioning pipe cleaners onto the body.
    9. Wrap the pipe cleaner like you did with the head, repeating to make two sets of legs.
  • 10. Once you are satisfied with the pipe cleaners, hot glue the head onto the body.
     

    11. We decided to trim the legs slightly to make it look better.


    12. At this point, you can choose to add a pom-pom for a nose.  
    13. Adjust the legs so your reindeer can stand up, and you're done!


xx, Thea and Yi Xin

Tuesday, 15 December 2015

DIY Pin-Up Board

Pin up boards are reeeeeally common and really pretty (not to mention useful). But there is always something wrong with the one I buy, whether it's the thickness or the frame. So I decided to come up with a plan to make one myself. (I haven't actually made this yet but it should work).

What to buy:

-A piece of soft wood (the size of this determines the size of the whole board)
- Scraps of wood to frame 
- A piece of cork the size of the soft wood OR A thick fabric (choose a nicely patterned one!)
- Ribbons
- Hot glue gun and glue sticks / Superglue
- Hooks (the ones for picture frames)

How to make it:

1. Gather all your materials and plug in your hot glue gun (if you choose to use hot glue).

2. Cut and size the cork, soft wood and/or the fabric if it is not the same size as each other. Remember to cut the wood for the frame the same sizes as the one parallel to it.

3. Glue them all into place. (the frame on the cork or fabric on the cork).

4. Wait for it to dry and add any decorations if you want to.

5. Using a drill or screws, put the hooks behind the pin-up board.

6. Hang it up with some ribbon and you're done!

XX, Jas

Friday, 11 December 2015

DIY Percy Jackson Blue Pancakes

When I was younger, I used to read the Percy Jackson series. One thing that I remember clearly were the blue foods that Percy's mum used to make. 

So here is my own version of her pancakes.

**this recipe make 

Ingredients:

-Self Raising Flour
Milk 
-Blue Food Colouring (you can use as much as you want, but the more you use the bluer it    will be)
-Belgian dark chocolate buttons (any chocolate chip/button will do, and use as much as you  want)
-1 tsp vanilla essence  
-Cooking oil (any type will do, I used Rice Bran Oil with the spray can)

How to prepare:

1. Sieve your flour into a large bowl. 

2. Add the milk and vanilla into the bowl. whisk until it becomes a creamy colour. 

3. Mix in your food colouring ( the shade you end up with will look close to a Tiffany or Baby     Blue)

5. Add in your chocolate buttons (If they are slightly larger, cut into quarters).

How to cook:

1. Spray/ Add a little bit of oil to your pan.

2. Pour a reasonably sized amount to your pan.

3. Cook until you can see the sides of the pancake change to a darker shade and 'bubbles' appear in the pancake.

4. Get your spatula under the pancake and flip carefully (if you are a bit afraid of this step, get an adult to do it).

5. Stack them up and repeat.

6. Serve and enjoy!


Serving tips
- Chop up some bananas, strawberries, blueberries or any other type of fruit.
- Melt up some more of the chocolate you are using to drizzle over the pancakes.
- Enjoy whilst hot! (The chocolate will be all gooey and delicious).


xx, Jas

Monday, 7 December 2015

DIY Nachos + Salsa

Hi there and welcome to Ukiyos latest blog post! Today I will be showing you guys a quick recipe/ tutorial for how to make Nachos with Salsa. Nachos are one of my favourite foods, so I hope that you enjoy these nachos as much as I do! Enjoy:)

Ingredients (To make about 3- 4 servings)
- About 250g of Corn Chips (It doesn't matter what brand or flavour you use, but for this recipe I will be using Mission brand Extreme Cheese)
- Grated Cheese (Again, it doesn't matter what type of cheese you use)

For the Salsa you will need:
-250 g tomatoes, diced; you can always use more of you feel this isn't enough
- 1/2- 1 tablespoon tomato sauce
- 1/2- 1 tablespoon olive oil
- 1/2 chilli, finely diced
-1/2 Small green capsicum, finely diced

Recipe:
1. Take a handful of corn chips from the packet and place on a plate
2. Then take a handful of grated cheese and place on top of the corn chips.


3. Microwave for 20 to 30 seconds.
4. Put the nachos aside for now, and get the salsa ingredients ready.
5. Add the oil to a sauce pan and then the capsicum.Stir for about 2 minutes, then stir in the tomato and tomato sauce, and then bring the mixture to boil.
6. Reduce the heat to medium- low. Simmer, uncovered, for about 15 minutes and then wait for the salsa to cool completely. 

Put the salsa onto the nachos, and enjoy πŸ˜ŠπŸ˜‹
- EliseπŸ’•

Wednesday, 2 December 2015

christmas shuffle mix

ITS DECEMBER.
Which means school ending, summer holidays starting, and most importantly, it's christmas season. I really enjoy this time of the year. I don't know why, but christmas makes me feel all warm and fuzzy inside. All the tests in school being over adds to the holiday spirit; being able to do absolutely nothing but listen to christmas music. So here is my playlist to get all the december vibes going. Follow us on spotify here


p.s. pick a song to start off the playlist, then make sure you click shuffle, because it's one of those playlists ;)

xx, thea

Sunday, 29 November 2015

Nutella Mug Cake

Ok, so i'm pretty sure that everyone loves nutella. Nutella goes with anything, or just by itself. But sometimes it's good to experiment and change it up a little. This mug cake is simple and easy and it doesn't require many ingredients. It's also big enough for two - depending on how much you love cake. 

Ingredients 
- 4 tbsp Self Raising Flour
- 3 tbsp White Sugar
- 1 Egg, Beaten until fluffy
- 2 or 3 tbsp Nutella (depends on your preferences) 
- 3 tbsp Milk
- 2 tbsp Cocoa Powder (optional)

Equipment
- (large) Mug
- fork/whisk/whatever you use to whisk stuff
- measuring cups

Method
1. Mix all the dry ingredients together in a mug. in a separate bowl, mix all the wet ingredients. Do not add in the Nutella yet.

2. Add the wet mixture to the dry mix in the mug. make sure that everything is blended properly and that there are no lumps of flour.

3. Add the nutella. This might take a while as the nutella will stick everywhere.

4. Microwave for 1.50 - 3 minutes. the time of microwaving may vary from different microwaves. I recommend that you start with 1 min 20 sec and if it is not done then microwave for another 15 seconds. Keep repeating this process till done.

You can eat the cake plain or add whipped cream or ice cream if you want. Enjoy!

xx, Yi Xin